Your contact database is the foundation of your CRM, and with the SalesSheet.ai mobile app, you can access it from anywhere. Whether you just met a prospect at a conference, need to look up a client's phone number before a meeting, or want to update contact details on the fly, the mobile contacts feature keeps you connected to your network at all times.
Before You Start
- The SalesSheet.ai mobile app installed on your device (installation guide)
- An active SalesSheet.ai account with at least one contact in your database
- A stable internet connection for syncing new changes (contacts are viewable offline after initial sync)
- Phone contacts permission enabled if you want caller ID and quick-add features
Open the Contacts Tab
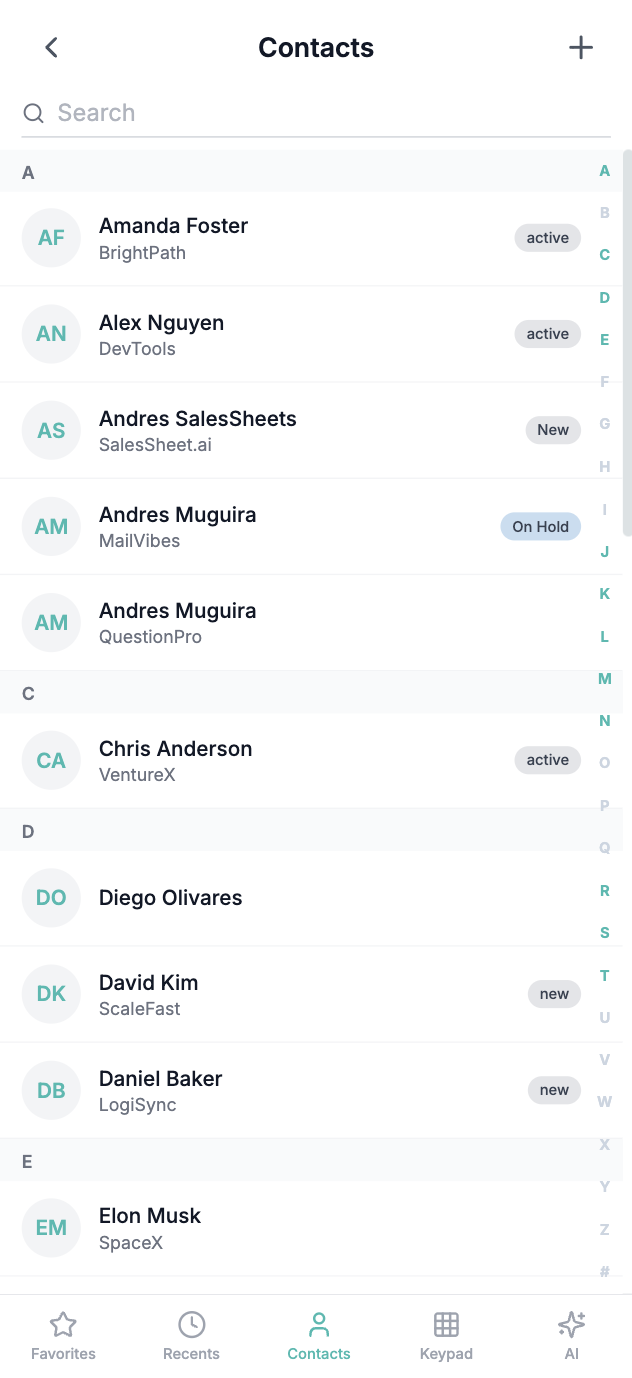
Launch the SalesSheet.ai app and tap the Contacts icon in the bottom navigation bar. This is represented by a person silhouette icon and is the second tab from the left. The contacts tab displays your full contact list, sorted alphabetically by default.
At the top of the contacts list, you will see a summary showing the total number of contacts in your database. Below that, contacts are organized with alphabetical section headers for easy scrolling. You can swipe up and down to browse through your contacts, or use the alphabet index on the right side of the screen for quick jumping to a specific letter.
Search for Contacts
Tap the search bar at the top of the contacts list to find specific people quickly. The search works across multiple fields including name, email address, phone number, company name, and tags. Results appear instantly as you type, filtering your list in real time.
For more targeted results, you can use filters by tapping the filter icon next to the search bar. Filter contacts by company, tag, last activity date, or deal stage. Combine multiple filters to narrow down your list further. For example, you could filter to show only contacts tagged "Hot Lead" at a specific company.
You can also ask the AI assistant to find contacts for you. Tap the AI chat icon and type something like "Show me all contacts at Acme Corp" or "Find contacts I haven't spoken to in 30 days" for natural language search.
View Contact Details
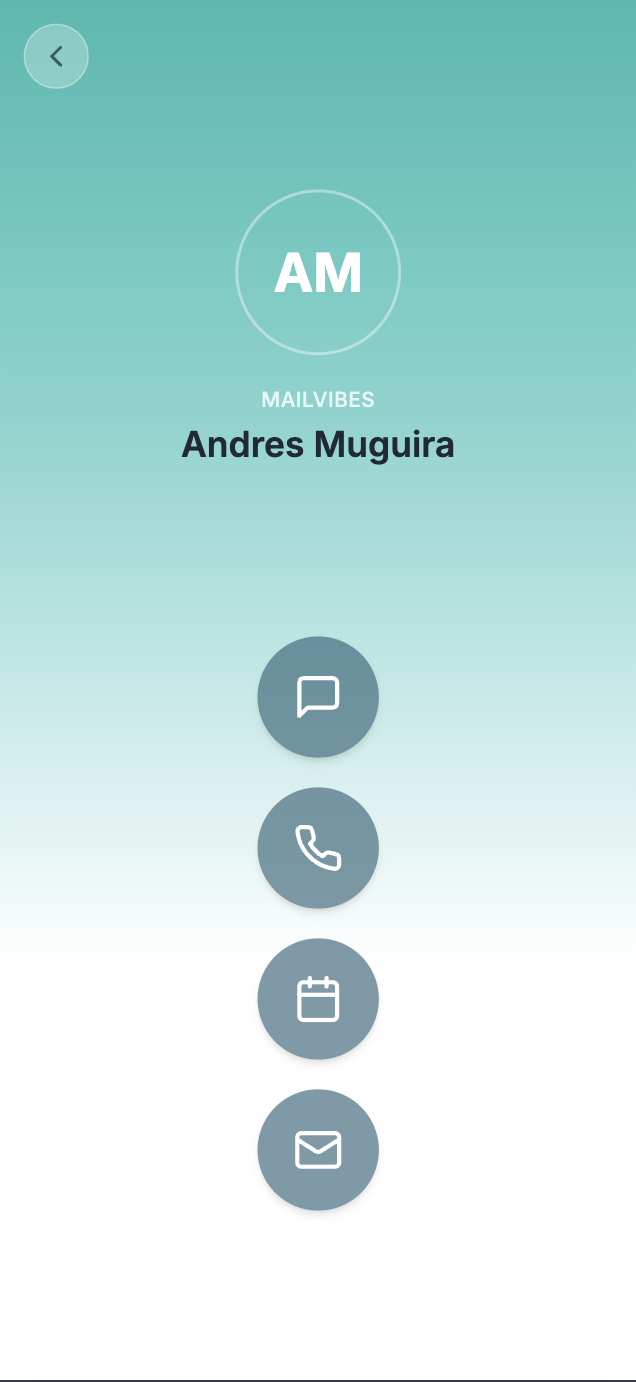
Tap on any contact to open their detail view. The contact detail screen is divided into several sections. At the top you will see the contact's name, title, company, and profile photo. Below that are quick action buttons for calling, emailing, or sending a text message.
Scroll down to see the activity timeline, which shows all interactions with this contact in chronological order: emails sent and received, phone calls, meetings, notes, and deal updates. Each activity entry includes a timestamp and a brief summary.
The Details tab shows all contact fields including phone numbers, email addresses, mailing address, custom fields, and tags. The Deals tab shows any opportunities associated with this contact and their current stage in your pipeline.
Add a New Contact
To create a new contact, tap the + button in the bottom-right corner of the contacts list. This opens the new contact form where you can enter the person's details. At minimum, enter a first name and either an email address or phone number.
The app supports several quick-add methods. Scan a business card: Tap the camera icon at the top of the new contact form to photograph a business card. The AI will extract the name, title, company, phone, and email automatically. Import from phone: Tap the contacts icon to select a person from your device's address book and import their information.
You can also add a contact by simply telling the AI assistant. Open the chat and say something like "Add a new contact: Jane Smith, VP of Sales at TechCorp, jane@techcorp.com" and the AI will create the record for you.
Edit an Existing Contact
Open a contact's detail view and tap the Edit button (pencil icon) in the top-right corner. This switches the view to edit mode, where all fields become editable. Make your changes to any field: update a phone number, change their title, add a tag, or fill in custom fields.
When you are finished making changes, tap Save to commit your updates. The changes sync to the cloud immediately and will appear on the web version within seconds. If you want to discard your changes, tap Cancel to return to the read-only view without saving.
To add a quick note to a contact without entering edit mode, tap the Add Note button on the contact detail screen. Type your note and it will be added to the activity timeline with a timestamp. This is useful for recording quick observations after a meeting or call.
Pro Tip: Use the AI to Update Contacts Faster
Instead of manually editing fields, open the AI chat from a contact's detail view and type natural language updates. For example, say "Update Jane's title to Chief Revenue Officer" or "Add the tag Enterprise to this contact." The AI processes the update instantly and confirms the change. This is significantly faster than tapping through edit forms on a small screen.
Important: Merging Duplicate Contacts on Mobile
If you add a contact on mobile that already exists in your CRM, SalesSheet.ai will detect the potential duplicate and prompt you to merge. Review the suggested match carefully before confirming. The merge combines both records into a single contact, preserving all activity history from both entries. If you are unsure, tap "Keep Both" to save the new contact separately and review later on the web.
What to Expect
With mobile contact management, you can keep your CRM database accurate and up to date no matter where you are. Here is what you can do:
- Access your entire contact database with offline support for viewing
- Search across names, emails, companies, and tags instantly
- Scan business cards to create contacts with AI-powered extraction
- View the complete interaction history and activity timeline for any contact
- Edit contact details and add notes that sync in real time to the web app
- Use the AI assistant for natural language contact management
- Import contacts directly from your phone's address book
- Detect and merge duplicate contacts with AI-powered matching
All changes made on mobile sync bidirectionally with the web version, so your team always sees the latest information regardless of which device was used to make the update.
Contact records are cached locally on your device after the initial sync. This means you can view contact details, browse your list, and read activity timelines even when you have no internet connection. New edits and additions will be queued and uploaded automatically when you regain connectivity.
Troubleshooting
Contacts are not showing up in the app
Pull down on the contacts list to trigger a manual refresh. If contacts still do not appear, go to Settings > Account > Force Sync to re-download your data. Ensure your internet connection is active and that you are signed into the correct workspace. If you recently imported contacts on the web, allow a minute for the sync to complete before they appear on mobile.
Business card scanning is not working correctly
For best results, place the business card on a flat, well-lit surface and hold your phone steady. Avoid shadows and glare on the card. The AI extraction works best with standard printed cards. If a field is extracted incorrectly, you can manually edit it before saving the contact. Make sure the app has camera permission enabled in your device settings.
Changes I made on mobile are not appearing on the web
Verify that your device has an active internet connection. The app queues changes and syncs them when connectivity is available. Check for a sync indicator icon in the app header. If a small cloud icon with an arrow appears, changes are still pending upload. Open Settings > Account to see the last sync timestamp. If changes remain stuck, try force-closing and reopening the app.
Search is returning unexpected or incomplete results
The mobile search indexes contact names, emails, phone numbers, company names, and tags. If you are searching by a custom field value, use the filter feature instead. Make sure your search query does not contain extra spaces or special characters. If you recently added contacts, pull down to refresh the contact list before searching to ensure the local index is up to date.